8.05.2014

Denim Bermuda Shorts [Sew Liberated Simple Skinny Jeans Review]

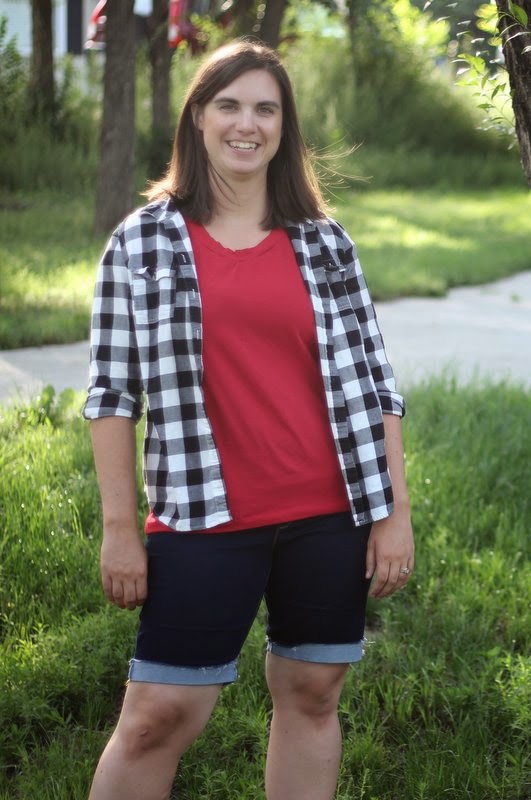
When Sew Liberated asked me if I wanted to review one of their patterns, I was very tempted to try one of their amazing shirts, but when I saw the skinny jeans pattern, I knew that I wanted to try that one and turn it into denim Bermuda shorts.

I sewed up a muslin to check for fitting, since jeans can be tricky to fit.  According to the size chart, I was between a 16 and 18, so I went with the 18.  I only had to make a few minor fit adjustments that I've had to make to every pair of pants I've sewn up.

My denim is from fabric.com and is the Kaufman High Stretch Denim.  It's pretty stretchy, which makes the shorts comfortable.  I'd love a second pair in a lighter color with not quite as much stretch for more of the boyfriend look.


Instructions:
  •  Instructions were well written and easy to follow
  • I was confused at first about the lapping method to construct the pants.  I did it for the pockets on my muslin, but then decided that I prefer the optional construction method she mentions of stitching right sides together and then top stitching, so that is what I did for the shorts
  • I LOVED!!! the video.  I'm a visual learner, so it was so helpful for me to see what she was doing in each step.

Fit & Modifications:
  •  I added length to my muslin pants and they still ended up being cropped, which was what I was going for, so if I wanted to make a full length pant I would need to add about 5" to the legs.  I'm 5'8" so I'm used to adding length to most patterns.
  • The fit through the thighs and bum was great! No modifications needed.  
  • The back yoke was a bit large at the center seam, so I ended up picking my seams and resewing that a bit smaller.  I also took it in a bit at the high hip to make it more snug.  This is the modification I've had to make with every pant pattern I've followed, so I think it's more my body shape than the pattern.
  • The calf on my muslin actually fit over my legs!!!! I can never buy skinny jeans in the store that fit my "muscular" legs so it was so nice that this pattern worked for me.
  • I used rib knit for the waist band so I took off at least 4 inches in the length to get it nice and snug.  I haven't had to pull up the shorts much either.
  • To make the shorts, I just marked where I wanted the shorts to end and then added 2 inches.  I slightly straightened the leg lines to that point so that they wouldn't dig in too much.
  • I stitched with a light gray around the top of the cuff to keep the cuff in place and prevent it from fraying too much.

Things I love:
  • Top stitching with a double needle.  So smart and saves so much time.   My machine didn't love doing it with the gold top stitching thread since it was thick, but I managed to get the pockets done that way before having to switch to a single neede
  • Knit waist band.  These shorts are so comfy and I also love that I could wear them during a future pregnancy or during that awkward post baby phase, or really just any day because who doesn't love a knit waist band
  • The video was super helpful to me

Things I didn't love:
  • Having to trace the pattern.  I've been spoiled by pdf patterns, but maybe tracing is better than cutting and taping a pattern together.
  • I could use the yoke to be a bit higher in the back.  Sometimes when I bend over, it gets a bit low.
  • I would have loved instructions and pattern pieces for real front pockets.  I attempted with the shorts, but the pockets I made are pretty small :)

I really love this pattern and think it's a great starting point for jeans and pants, especially if you haven't sewn those before.  I also think that the waist band makes them super practical for pregnancy pants and I know I'll be using it for that sewing in the future (hopefully).

My red shirt is a Union St. Tee by Hey June, sewn up in Kaufman Laguna Stretch.  Plaid shirt is from Old Navy.


And because one should never take themselves too seriously, here's me frolicking through the grass :)


Sew Liberated provided me with a copy of the Simple Skinny Jeans pattern for me to review.  All opinions are my own.


8.04.2014

Girls Night Out

One of our good friends is moving away, so the girls went out to dinner to say goodbye.  It was a good excuse to get dressed up and wear some of my dressier clothes that I've made.


The shirt is a Casual Lady from Go To Patterns.  It is made with a stretch lace that I lined with a white jersey, both from Girl Charlee.  I connected the shirt at the neckline and then hemmed the sleeves together.  The bottom hem is separate with the lace coming down a bit below the lining.


The pants are Sew Liberated's Simple Skinny Jeans. I am reviewing the pattern for them, so these were my super wearable muslin to check for fitting.  I'll elaborate more on the pattern in a future post, but I really like how these turned out.  The material is a gray stretch twill from Hobby Lobby.  It's pretty slinky and stretchy.  I wish it had a bit more structure to the fabric, but they worked for a dressier pant.


Thanks Melisa for taking these pics for me!

Sew Liberated provided me with a copy of the Simple Skinny Jeans pattern to review.  All opinions are my own.

Knit Foxglove Tank

I attempted a Foxglove Tank in knit this time.  I still didn't want it quite a loose as the original pattern so I used the Lille Racerback pattern too and kind of split the different in how wide I cut the front and back out. 

I love how the neck and arms are finished with knit strips on the inside.  Super easy and such a clean finish.  I finally figured out how to get a twin needle to work on my machine so hemming wasn't too bad either.  My machine does best with a very narrow twin needle to prevent tunneling.


This fabric is a dream.  It's so soft.  I would wear this every day if I could.  Pattern placement was tricky to avoid a feather right on the boob, but I think I pulled it off pretty well.


8.01.2014

Mint Foxglove Tank (sort of)

When the Foxglove Tank came out, I loved the look of it.  All the tester's photos were so great.  So I bought it.  And then I bought this April Rhodes voile fabric, but didn't look at how much I needed.  So I had to get a bit creative and make it less flowy.


I added about 5 inches to the length in the front to account for my chest :).  I also took out some of the high low hem because I'm not the biggest fan.  Once I had it sewn up, it just wasn't laying well, so I added darts to the chest, using a blouse that I have as a guide.  Ahh, much better.


I still took it in a bit more on the side, probably a bit too much.  I like the fit, but it could be a bit looser at the hips.  I feel that as a size larger than most patterns are designed for, pulling off the blousy/loose look can be a bit tricky to have it look loose but not make me look bigger.


I think I'll like this pattern better sewn up in a knit.  I do like this shirt as an alternative to my typical knit shirts.  And check out those gold triangles.


7.30.2014

Floral Lille Racerback Tank

July has been hot so I needed some tanks for those hot days of playing outside with the boys.  I liked the look of the Lille Racerback Tank.  It's sporty, but I think with the right fabric, it can still look nice. 


I don't remember exactly where this fabric is from.  It's not super stretchy.  I should have made it a size larger because of that, but it still fits ok.  Just a bit tight in the chest.


This fabric is definitely out of my normal fabric choices, but I like it and Mike really likes this shirt too :)

I also made a white tank top from this pattern that I'm wearing under this shirt and that I wear all the time.  


7.28.2014

Pink Plantain Tee

I love free patterns because it doesn't feel like much a risk to try it.  This is my second plantain shirt (or maybe 3rd, I can't remember).  I made a few modifications, like going 2 sizes down in the hips so that the shirt is a bit more slim line.  The neckline of this shirt is a dream to put it.  Perfecto sizing on the neckband.


The fabric is from Girl Charlee (I know, no shocker there).  I wish it was a smidge more stretchy, but it has held up really well in the wash, so I like that part of it.  They are out of the pink but have the same fabric in ice green and purple.


7.24.2014

Adding color to the living room


Our living is a sad room filled with lots of beige.  We have dark brown curtains and brown couches and the walls are a light tan color.  I had a large picture hanging on the wall for awhile but it was a neutral color too.

So pinterest to the rescue! I saw this map idea on there and decided to replicate it.  Once I had it up, I wanted to hang a few more things to make it more of a gallery wall.  And then, of course, I needed to make a fun arrow garland.  Color!!!!!


The Delight Yourself in the Lord print is from here (free!).  The boys had fun helping me figure out where to hang stuff.


 The bike print is from here (free) and the Be Brave print is from here (free).  The hoops are just stretched fabric that I had that I just glued around the hoop and the V is chipboard from Hobby Lobby that I just painted quick with some Martha Stewart acrylic paint.


 And one more of my "helpers"


5.12.2014

Cozy Camera Case Giveaway

Hurry for Giveaway Day!!!! I've got 2 giveaways going on this time.  This one is for a Cozy Camera Case, your choice of size.  Check out the options in my etsy shop.  Enter below with the Rafflecopter and check out my other giveaway here.


http://www.sewmamasew.com/may2014/MayGiveawayDay.jpg

a Rafflecopter giveaway

Cozy Snacks Giveaway

Hurray for Giveaway Day! I've got 2 giveaways going on today. This one is for a set of 3 snack and sandwich bags. Your choice of which set of three you want. Options can be seen in my Etsy Shop.
Enter below with the Rafflecopter and check out my other giveaway that's going on too.


a Rafflecopter giveaway

  http://www.sewmamasew.com/may2014/MayGiveawayDay.jpg

5.09.2014

Pattern Blocked Shoreline Boatneck


I've had this vision for a shirt for awhile that had polka dots and stripes.  I finally found the perfect fabric from Girl Charlee.  It's a dreamy Ponte de Roma knit that is so soft and was super easy to sew up.

I decided to use the Shoreline Boatneck from Blank Slate Patterns as my starting point since I love the nautical look for summer.

Here's a mini-tutorial of what I did:

1. I folded the sleeve pattern from the arm pit points across the top edge of my ruler in the picture.  When I cut it out, I added .5 inches to the top piece and bottom piece for seam allowance.  Then I sewed up the polka dot sleeve top to the striped sleeve bottom.


2. I repeated the same thing for the bodice pieces, folding from the bottom of the arm whole across the bodice front and back.  I considered only pattern blocking the front piece but I like having the polka dots on the back too.  Then I sewed the polka dot and stripe front and back pieces together using a .5 inch seam allowance.

3.  Then I just followed the rest of the pattern as written.  Things did get a bit bulky under the arms with all of the seams coming together, but a quick press made everything lay flat.


I just love this shirt and want to wear it everyday.  I paired it with my Burda Style Anita Jeans for a fun all Me-Made outfit.


Me-Made-May [Days 1-9]

Hurray for Me-Made-May!
I'm excited to try and participate as much as possible this year.  My goal is to wear one hand made piece each day.  And to remember to take a picture each day.  I forgot a picture one day, but I've been doing well with the challenge.  Outfit details are below.


Top: Pattern-Seafarer Top Fabric-Girl Charlee Fabric
 

Top: Pattern-Self Drafted Fabric-Girl Charlee Fabric
Shorts: Self Drafted Fabric-Joanns


Top: Pattern-Plantain Tee Fabric-Girl Charlee Fabric

Top: Pattern-Burda Style  Fabric-Girl Charlee Fabric