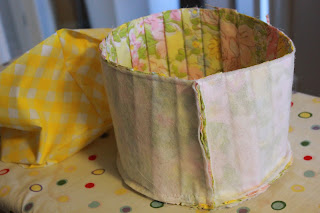
Keep reading for the tutorial.
You need an outside fabric, an inside fabric and some sort of stabilizer. Interfacing, fusible fleece, or canvas would work fine. You need a half yard of inside fabric and fusible fleece. For the outside fabric, you need a piece that is about 90 inches long. I used a vintage bed sheet. You can sew short pieces together to get one long piece. I sewed everything with a 1/2 inch seem allowance.
1. Cut a circle the size you want your basket. I just traced around a bowl and my circle ended up having a diameter of 8.5 inches.
2. Cut out a circle from your outside fabric, inside fabric and fusible
fleece. You could also use interfacing or canvas. Something to give it
structure. Iron fusible fleece to backside of outside fabric.
3. To figure out how long your side piece needs to be, you need to figure out the circumference of your circle. To do this take the diameter of your circle (all the way across) x 3.14. Or just use your tape measure and measure around the circle. Add an inch to your length to account for seam allowance.
My piece was 27 inches long. I wanted to make my basket 6 inches high. To make a basket without pleats, cut 1 piece of outside fabric, 1 piece of inside fabric and 1 piece of stabilizer this size.
For pleats, I cut my fabric 3 times as long. I had extra but I wanted to make sure. So my outside piece was 90 inches x 6 inches. If your fabric isn't long enough, you can piece a few smaller pieces together. I used the smaller measurement (27x6) for the lining and stabilizer.
4. To make the pleats, fold the fabric over in one direction. Move up a bit and fold over again in the same direction. I just kind of eyeballed the pleats. No fancy measurements. It helped to have it on my cutting mat so I could try to keep the pleats about the same size. Here's my piece fully pleated.
5. Iron on fusible fleece to backside of pleated piece.
6. Sew a basting stitch down each side of the pleated piece to hold them in place. I sewed it pretty close to the edge so it wouldn't show.
7. Measure again how long you need the side piece to be. Then sew your pleated piece, right sides together, so it is that size. Trim off extra. It should now be a tube.
8. Pin bottom piece to side tube. Pin often!!! You may find you need to make adjustments to the side piece if it is still too big. Just sew it a bit smaller if needed. (this picture is of my lining, but you should do this to the outside fabric)
9. Now you should have the outside of the basket made. Go back and repeat the steps with the lining, skipping the pleats if you don't want the inside pleated. When sewing the lining, leave a 3-4 inch gap along the bottom to side seam to turn the basket right side out. Shown in above picture.
10. To make the handle, cut a piece of fabric and fusible fleece that is 4 inches wide by 15 inches long. You can adjust based on what you need. Iron on the fusible fleece. Fold the piece in half along the long length, right sides together. Sew along the long side and then turn right side out. Press.
11. Pin handle to right side of outside fabric. This piece should still be inside out. So the handle is down in the basket along the bottom. The opposite of what you will want it to look like when done.
12. Turn lining right side out. Pin to outside fabric so right sides are facing and the handle is sandwiched in between. Pin a lot. Sew around top edge. If you've ever made a purse or bag, this may seem familiar.
13. Using the whole left in the lining, turn the basket right side out.
14. Sew up the whole in the lining. Sew close to the edge so the thread doesn't show.
15. For this basket, I wanted the inside fabric to show on the top so I ironed the lining to stick out about a half inch on the top. Either way, iron the top seam and then top stitch around the top twice, making sure the handles are pointing up.
16. Fill with lots of goodies for your kiddos (or yourself!)
Here's the more boyish one I made for Hudson. No pleats but still cute polka dots.
linking up here and here.


This is so cute, wish my daughter was little again so I could make her one.
ReplyDeleteLOVE this!! i want one for millie! maybe i will give it a try... good job friend!
ReplyDeleteyou totally could make one. super easy sewing. the pleating took awhile but otherwise it was fast.
DeleteAwesome job! I would love for you to link up at my Linky party via: http://ourdelightfulhome.blogspot.com/2012/03/show-me-what-you-got-linky-party-6.html
ReplyDeleteMrs. Delightful
www.ourdelightfulhome.blogspot.com
Oh what fun! I'm adding this to the project list for my Bag of the Week blog.
ReplyDelete