3.30.2012

spring toddler craft

I wanted to make a fun spring craft with Hudson to send to some family members for Easter.  I don't do a lot of structured crafts with him since he is still uninterested in them.  This craft was made possible by my wonderful husband doing the painting with him while I took pictures.

Easter Thumbprint Flowers

I cut out small circles from scrapbook paper and glued them on some card stock.  Then, using my Clementine Paint, we dipped his thumb in the paint on the lid.


With Mike's help, Hudson put thumb prints around the circles to be the petals.  Lots of help needed here.  Hudson had a hard time keeping his thumb straight at first, but caught on quick.  I ended up turning the paper so Mike could concentrate on not getting paint everywhere. 


I then added stems and cut grass for the bottom.  This one is headed to my sister, Karen, to help brighten her day with some goodies for her last week in the hospital.


My entry into Creative Me is sponsored by Appliances Online and Bosch Washing Machines.

3.25.2012

craft room redo {part 2} - fabric storage

As part of the craft room redo, I wanted to add some more storage for my fabric.  It's been housed in two plastic tubs and a bazillion joann fabric bags.  

I came across this great idea on pinterest to turn a file cabinet into fabric storage.

picture from sewmanyways.blogspot.com


I got an old file cabinet from craigslist for $5!!! Most of them were $40 or more but this one was perfect.  It's definitely used and had some rust spots, but I knew I was going to paint over it anyway.

I wiped it down and then taped off the handles.  Then it was time to spray paint.  This was my first time spray painting anything.  I used a rustoleum primer that was good for metal.  I used the whole can and did 4 thin coats.  


Now for the fun part.  I used Rustoleum Ultra Cover in Satin Lagoon.  I wanted to go with a bold color since most everything else in the room will be a neutral.  I love love how it turned out.  I know I took pictures of the process, but I can't find them on the computer.  I did 5 thin coats, which used the whole can.

Here's the pretty blue color.  I wanted to stencil on it a bit too.  I used Martha Stewart's new paint for Michaels and her stencil brushes and one of her stencils.  All bought with 50% off coupons, of course.


This was my first time stenciling anything.  I should have started on the side, since there was a bit of a learning curve.  I started out with too big of a brush, so some paint bled through.  I still love how it turned out, just don't look too close.

And here it is.  The white and red really break up the blue so it's not too much. 


To hang the fabric, I cut file folders in half and just wrapped the fabric around the folders and pinned it in place.  Some folders have 2 pieces of fabric wrapped around.  Now I can see all of my fabric and it doesn't get all wrinkly in a big bin.  It's already full and I still have some more fabric.  I'm going to have to come up with a secondary way to store some.


3.24.2012

craft room redo {part 1}


 This is what my craft room looks like 90% of the time.

It's a horrible mess and makes me super unmotivated to sew.  I finally decided to get my act together and tackle a little redo so I can have a pretty crafty space.

This desk is where I sew.  It was originally bought for Mike to study while in seminary, but when we moved in, I took over the desk.  It doesn't work well for sewing because it is a corner desk, so there isn't a lot of room for fabric.  

After I cleaned up the room, Mike took the desk apart and we just threw it away.  It was in pretty bad condition.  I'm going to use a 6 foot long banquet table so that I have room for cutting and sewing.


 I cleaned everything up.  Threw a lot of stuff away, and everything else is boxed up in the crawl space.  I'm going to paint the room a much lighter white, hoping that it will brighten up the room since it is in the basement.  All the paint was free from Ace Hardware with their free quart of paint on Saturdays in March.

Here's the room almost empty.  Just a few things left on the chair and the bookshelf.  Next up, taping off the baseboards.  I'm hoping to get it painted this week while my mom is in town.


3.21.2012

recent reads

Things have been slow on the reading front, but I have managed to read a few books.
Product Details
First up, The All New Square Foot Gardening by Mel Bartholomew.  We're attempting our first garden this summer and we knew that raised beds were the direction we wanted to go.  This book really helped me figure
out where to put stuff in the beds and how much to plant.  I've got a little plan worked up and I'm excited to get to start planting in a few weeks.


Product DetailsThe second book I finished was Black Heels to Tractor Wheels by Ree Drummond.  I really loved this series on the Pioneer Woman's blog so I figured I would enjoy the book too.  It's such a great love story and I really enjoy her style of writing.


Product DetailsThe third book I finished was Real Food for Mother and Baby by Nina Planck.  No, I'm not pregnant, but my friend Jen recommended I read this book.  I was really fascinated by the section on eating for fertility and how important certain vitamins are.  She mentions cod liver oil several times, which I've been taking (not every day) for the last month because I kept reading about it.

My favorite part of the whole book was when she talked about what to do if you're sick in the 1st trimester.  I was worried that this book would make me feel bad about not being able to eat, but I liked her philosophy.  A lot of the preggo diets out there are so much food.  She said that if you can't eat much due to morning sickness, just make sure what you do eat is a real food.  I'm sure I'll still consume a large amount of Gatorade with the next pregnancy (it's already stockpiled in the basement) but I'm going to try to get some good food in there too when I can.  I did kind of skim the section on breastfeeding and what to feed your kid since we've already figured that out for the most part.

3.16.2012

pleated easter basket

Hudson needs an Easter basket and I'm to cheap to buy him one so I figured I could just sew one for him.  Then, while I was thinking up my plan, I decided that it would be super cute to have a pleated Easter basket.  So here's what I came up with.  (the pleated one is for decoration.  I made him a non-pleated one, that is a little more boy friendly)


Keep reading for the tutorial.  

You need an outside fabric, an inside fabric and some sort of stabilizer.  Interfacing, fusible fleece, or canvas would work fine.  You need a half yard of inside fabric and fusible fleece.  For the outside fabric, you need a piece that is about 90 inches long.  I used a vintage bed sheet.  You can sew short pieces together to get one long piece.  I sewed everything with a 1/2 inch seem allowance. 

1. Cut a circle the size you want your basket.  I just traced around a bowl and my circle ended up having a diameter of 8.5 inches.  
 

 2. Cut out a circle from your outside fabric, inside fabric and fusible fleece.  You could also use interfacing or canvas.  Something to give it structure.  Iron fusible fleece to backside of outside fabric.


3. To figure out how long your side piece needs to be, you need to figure out the circumference of your circle.  To do this take the diameter of your circle (all the way across) x 3.14.  Or just use your tape measure and measure around the circle.  Add an inch to your length to account for seam allowance.

My piece was 27 inches long.  I wanted to make my basket 6 inches high.  To make a basket without pleats, cut 1 piece of outside fabric, 1 piece of inside fabric and 1 piece of stabilizer this size.

For pleats, I cut my fabric 3 times as long.  I had extra but I wanted to make sure.  So my outside piece was 90 inches x 6 inches.  If your fabric isn't long enough, you can piece a few smaller pieces together.  I used the smaller measurement (27x6) for the lining and stabilizer.

4.  To make the pleats, fold the fabric over in one direction.  Move up a bit and fold over again in the same direction.  I just kind of eyeballed the pleats.  No fancy measurements.  It helped to have it on my cutting mat so I could try to keep the pleats about the same size.  Here's my piece fully pleated.

5. Iron on fusible fleece to backside of pleated piece.

6. Sew a basting stitch down each side of the pleated piece to hold them in place.  I sewed it pretty close to the edge so it wouldn't show.

7.  Measure again how long you need the side piece to be.  Then sew your pleated piece, right sides together, so it is that size.  Trim off extra.  It should now be a tube.

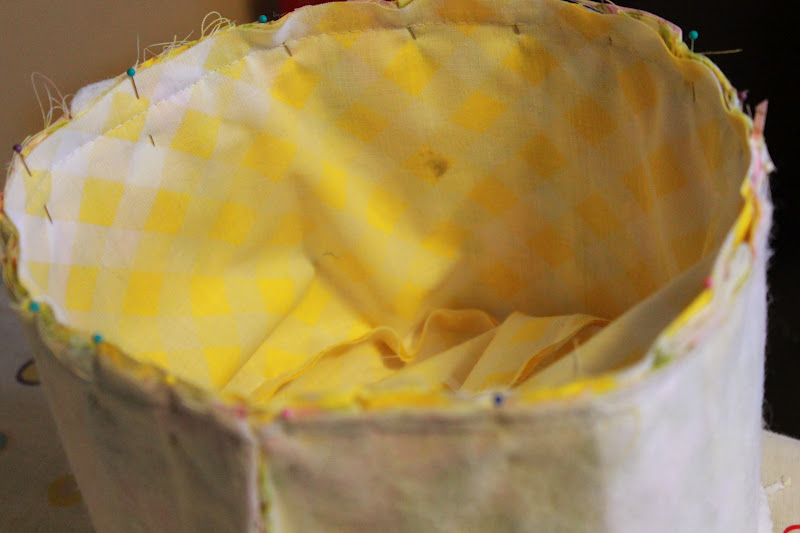
8. Pin bottom piece to side tube.  Pin often!!!  You may find you need to make adjustments to the side piece if it is still too big.  Just sew it a bit smaller if needed. (this picture is of my lining, but you should do this to the outside fabric)

9.  Now you should have the outside of the basket made.  Go back and repeat the steps with the lining, skipping the pleats if you don't want the inside pleated.  When sewing the lining, leave a 3-4 inch gap along the bottom to side seam to turn the basket right side out.  Shown in above picture.

10.  To make the handle, cut a piece of fabric and fusible fleece that is 4 inches wide by 15 inches long.  You can adjust based on what you need.  Iron on the fusible fleece.  Fold the piece in half along the long length, right sides together.  Sew along the long side and then turn right side out.  Press.


11.  Pin handle to right side of outside fabric.  This piece should still be inside out.  So the handle is down in the basket along the bottom.  The opposite of what you will want it to look like when done.

12.  Turn lining right side out.  Pin to outside fabric so right sides are facing and the handle is sandwiched in between.  Pin a lot.  Sew around top edge.  If you've ever made a purse or bag, this may seem familiar.

13.  Using the whole left in the lining, turn the basket right side out.

14. Sew up the whole in the lining.  Sew close to the edge so the thread doesn't show.

15.  For this basket, I wanted the inside fabric to show on the top so I ironed the lining to stick out about a half inch on the top.  Either way, iron the top seam and then top stitch around the top twice, making sure the handles are pointing up. 

16.  Fill with lots of goodies for your kiddos (or yourself!)

 Here's the more boyish one I made for Hudson.  No pleats but still cute polka dots.


linking up here and here.

3.15.2012

madness

Mike loves March Madness and I enjoy watching the games.  He's tried to organize a bracket among our friends in years past, but it never seems to work out.  This year we decided to do a little family challenge. 

Mike has Michigan State winning it all.
 I decided to go with the obvious this year and pick Kentucky.  For the past few years, I've picked the Badgers to win it, but that hasn't really panned out.  And I want to win this year.
 We had Hudson pick based on mascots.  Let's just say that teams with dogs, tigers or alligators were at an advantage.  Hudson has a bit of an underdog with Gonzaga, but if they pull it off, we'll be impressed.

3.13.2012

a dress

Last time I was at Joann Fabric, they had all their simplicity fabrics on sale.  Last summer I sewed a couple of patterns, so I figured I would try again.  I found this super cute Lisette pattern and figured I would go for it.

 I found a sew along to follow from last year which was very helpful.  They posted pictures of each step and explained some of the steps in more detail.  The most confusing part of the pattern was the pockets.  I definitely had to step away from sewing for a little bit.
I'm pretty happy with how it turned out.  I wish it was longer, so I'm pondering adding more fabric to the end.  I'm out of the brown fabric so I might try to match up the red fabric.


 Pocket!!!

  I felt so stupid being a model.  Luckily Mike didn't make fun of me.  I had no idea how to stand.

crafty meet up

On Saturday, Melissa, Jennifer, Sarah, Sarah and I went up to Denver for a little craft blogger meet up hosted by Make It and Love It and KoJo Designs.  It was such a fun afternoon.  There was great food and some fun crafts to make.

painting
magnets

treats

a thank you
amazing cupcake


kirstin (left) & ashley (right) answering questions

paint i won

sarah, jennifer, me, melissa and sarah