Showing posts with label sewing. Show all posts

4.07.2013

sewing for me [casual lady top]


When Andrea from The Train to Crazy released the Casual Lady Shirt pattern earlier this week, I wasn't sure I was going to buy it.  I'm super cheap and $12 just seemed like a lot for a pattern considering that I usually buy them for $1 when they're on sale at Joanns.

The Casual Lady top and dress sewing pattern. Great for beginners!

But then, as I thought about it more (at 4 in the morning) I realized that it was just 3 drinks from Starbucks and the money was going to fund a Sewing Collective in India for single moms who are escaping the sex trade industry.  So really it was like I was donating $12 to that and getting a pattern as a bonus. 

I was blown away by how professional the pattern is with little diagrams and everything.  And the language was not sewing language but normal, easy to understand English.  It was such a quick sew and I know I'll be making more for the summer.


 I only had 1 yard of fabric (gray chevron from Girl Charlee) so I didn't do the full neck facing, but just did a small facing around the neck and then top stitched it down.  I love how flattering it is.  I cut out an XL and it is a perfect fit.  I'm not a big fan of crew necks, so I love the more round neck that is still very modest.  I also am not a big tank top fan so I like the little sleeves but it will still be cool enough for summer.


4.05.2012

sewing for me

Inspired by the Spring Top Contest at Made-by-Rae.com and Kojo-designs.com series on sewing for your self, I broke out a couple of patterns I've had for awhile and did a little sewing for me.  

The first one is a shirt using Simplicity #2892.  The fabric is Lisette fabric I found on clearance at Joann Fabrics.  

I always have a hard time figuring out what size to cut.  I ended up taking this top in quite a bit on the sides.  I also wish I would have made it a bit longer.  I added an inch to the bottom, but should have added more.  The neckline was a pain to make with all the ruffles.  I don't think I would make another shirt from this pattern again.


hudson wanted in on the pictures

The second thing I sewed was a cute knit dress using McCall's M6032.  I love love this dress.  Getting the gathering and belt right was a bit tricky, but it's so comfy to wear and didn't take too long to make.  I got it done in a day between nap times and sewing after H-man went to bed.   I would probably make this dress again if I found some cheap knit or something similar.


3.16.2012

pleated easter basket

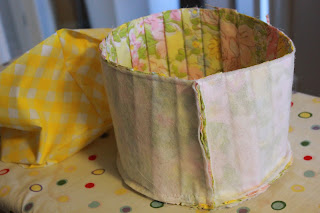
Hudson needs an Easter basket and I'm to cheap to buy him one so I figured I could just sew one for him.  Then, while I was thinking up my plan, I decided that it would be super cute to have a pleated Easter basket.  So here's what I came up with.  (the pleated one is for decoration.  I made him a non-pleated one, that is a little more boy friendly)


Keep reading for the tutorial.  

You need an outside fabric, an inside fabric and some sort of stabilizer.  Interfacing, fusible fleece, or canvas would work fine.  You need a half yard of inside fabric and fusible fleece.  For the outside fabric, you need a piece that is about 90 inches long.  I used a vintage bed sheet.  You can sew short pieces together to get one long piece.  I sewed everything with a 1/2 inch seem allowance. 

1. Cut a circle the size you want your basket.  I just traced around a bowl and my circle ended up having a diameter of 8.5 inches.  
 

 2. Cut out a circle from your outside fabric, inside fabric and fusible fleece.  You could also use interfacing or canvas.  Something to give it structure.  Iron fusible fleece to backside of outside fabric.


3. To figure out how long your side piece needs to be, you need to figure out the circumference of your circle.  To do this take the diameter of your circle (all the way across) x 3.14.  Or just use your tape measure and measure around the circle.  Add an inch to your length to account for seam allowance.

My piece was 27 inches long.  I wanted to make my basket 6 inches high.  To make a basket without pleats, cut 1 piece of outside fabric, 1 piece of inside fabric and 1 piece of stabilizer this size.

For pleats, I cut my fabric 3 times as long.  I had extra but I wanted to make sure.  So my outside piece was 90 inches x 6 inches.  If your fabric isn't long enough, you can piece a few smaller pieces together.  I used the smaller measurement (27x6) for the lining and stabilizer.

4.  To make the pleats, fold the fabric over in one direction.  Move up a bit and fold over again in the same direction.  I just kind of eyeballed the pleats.  No fancy measurements.  It helped to have it on my cutting mat so I could try to keep the pleats about the same size.  Here's my piece fully pleated.

5. Iron on fusible fleece to backside of pleated piece.

6. Sew a basting stitch down each side of the pleated piece to hold them in place.  I sewed it pretty close to the edge so it wouldn't show.

7.  Measure again how long you need the side piece to be.  Then sew your pleated piece, right sides together, so it is that size.  Trim off extra.  It should now be a tube.

8. Pin bottom piece to side tube.  Pin often!!!  You may find you need to make adjustments to the side piece if it is still too big.  Just sew it a bit smaller if needed. (this picture is of my lining, but you should do this to the outside fabric)

9.  Now you should have the outside of the basket made.  Go back and repeat the steps with the lining, skipping the pleats if you don't want the inside pleated.  When sewing the lining, leave a 3-4 inch gap along the bottom to side seam to turn the basket right side out.  Shown in above picture.

10.  To make the handle, cut a piece of fabric and fusible fleece that is 4 inches wide by 15 inches long.  You can adjust based on what you need.  Iron on the fusible fleece.  Fold the piece in half along the long length, right sides together.  Sew along the long side and then turn right side out.  Press.


11.  Pin handle to right side of outside fabric.  This piece should still be inside out.  So the handle is down in the basket along the bottom.  The opposite of what you will want it to look like when done.

12.  Turn lining right side out.  Pin to outside fabric so right sides are facing and the handle is sandwiched in between.  Pin a lot.  Sew around top edge.  If you've ever made a purse or bag, this may seem familiar.

13.  Using the whole left in the lining, turn the basket right side out.

14. Sew up the whole in the lining.  Sew close to the edge so the thread doesn't show.

15.  For this basket, I wanted the inside fabric to show on the top so I ironed the lining to stick out about a half inch on the top.  Either way, iron the top seam and then top stitch around the top twice, making sure the handles are pointing up. 

16.  Fill with lots of goodies for your kiddos (or yourself!)

 Here's the more boyish one I made for Hudson.  No pleats but still cute polka dots.


linking up here and here.

3.13.2012

a dress

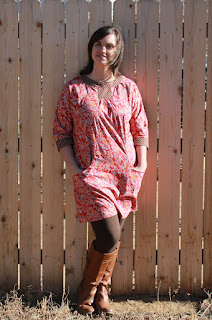
Last time I was at Joann Fabric, they had all their simplicity fabrics on sale.  Last summer I sewed a couple of patterns, so I figured I would try again.  I found this super cute Lisette pattern and figured I would go for it.

 I found a sew along to follow from last year which was very helpful.  They posted pictures of each step and explained some of the steps in more detail.  The most confusing part of the pattern was the pockets.  I definitely had to step away from sewing for a little bit.
I'm pretty happy with how it turned out.  I wish it was longer, so I'm pondering adding more fabric to the end.  I'm out of the brown fabric so I might try to match up the red fabric.


 Pocket!!!

  I felt so stupid being a model.  Luckily Mike didn't make fun of me.  I had no idea how to stand.

2.23.2012

some other sewing

I've managed to get a few other projects done in the last few days now that Hudson is on the mend.  I needed a smaller diaper bag of sorts for when we drop him off at the church nursery or to throw in my purse when we're just going to be gone for a little while.  Something to hold a diaper, wipes and a few snacks but not as big as our diaper bag from when he was a baby.

I found this great tutorial via pinterest that was super easy to follow.  All I had to buy was a zipper because I had the fabric already.  I used Michael Miller's Just Dig It fabric that I had purchased in Fort Collins over a year ago and never used.  The inside was lined with some random dot fabric from JoAnns.  I made it taller than the tutorial because I wanted to be able to put a few more things in it and also have room for a cloth diaper.


Another fun little thing I made was this sweet doll for Miss Millie, who just turned 1.  We missed her party due to germs, but I hear from her mama that she loves it.  Again, made with fabric I already had.  The head and arms are from an old sheet.  The body is a vintage sheet I got from goodwill awhile ago.  The skirt is from some knit that Millie's mama actually passed on to me (did you catch that, Jennifer) and the legs are from a baby sleeper from goodwill.  I had fun adding the skirt and the little headband and flower to the basic doll pattern to make it more personalized. 
thanks jennifer for the picture.  i forgot to grab one before i wrapped it up.

2.22.2012

choo-choo

A certain little boy is obsessed with all things that move, especially trains.  We read a lot of books about trucks and cars and trains.  Over and over and over again.  One of our favorite books is Freight Train by Donald Crews.
 I found a great train clip art from this site and printed it off at 50% so it would be small enough for the shirt.
 Then I traced them on to some heat n bond backwards from the direction I wanted them to face.  I wrote the color that I wanted each train car on the paper so I wouldn't get confused.  The train in the book is all different colors and I wanted to mimic that.
 I just used fabric from my scrap bin.  I had to get a little creative with the purple.  That's what happens when you have a boy, I guess.
 I played around with how I wanted the train on the shirt.  I knew that I wanted it to wrap around to the back of the shirt.  I liked the diagonal train better than the one just straight across.

 I pealed off the back of the heat and bond and ironed it all on and then sewing around each car to help keep them in place.  I didn't do all of the details, like the wheels.  Just the basic outline of each car.


 I also sewed a long black line along the bottom of the train cars to be the track.  Here's the back of the shirt.
 Somebody loves his shirt.  He was so excited when I showed it to him and had to put it on right away.


linking up here


kojodesigns
The Southern Intitute

2.18.2011

skirt

Made myself a skirt. I used a mock turtle neck on clearance from target for the brown and some fabric I had leftover for the floral print. I didn't follow a pattern, I just used a skirt that I own and patterned it after that. I think my favorite part is the waistband. I used the sleaves and turned it into a yoga style waistband. It's super comfy. There will be more skirt making in my future for sure.
It's ok if your clothes match your sewing machine cover, right?
Posted by Picasa